This blog should ideally be read in conjunction with the Key Stage 2 post which can be found here. The purpose of this post is to ensure that children reach the end of Key Stage 1 ready to build on their chronological understanding in Year 3.
EYFS
The new EYFS framework which comes into effect in September has a strong emphasis on the subject discipline of history. The ELG: Past and Present (P14) emphasises the beginnings of chronological understanding by ‘Know[ing] some similarities and differences between things in the past and now,’ and ‘Understand the past through settings, characters and events encountered in books read in class and storytelling.’. On a personal level, this would bring in line the curriculum approach with that of KS1 and 2.
If we spend time reading the Key Stage 1 element of the National Curriculum 2014 (NC), the many references to chronology should become clear. It can be broken down into two sections:
· An awareness of the past, using everyday vocabulary
· Chronological position (framework)
These are both fundamental and should be evident every time history is taught. The main focus of this particular blog is that ‘They should know where the people and events they study fit within a chronological framework and identify similarities and differences between ways of life in different periods.’ from the KS1 subject content paragraph. But please remember that this should be done in conjunction with the development of vocabulary to show the passing of time.
Key Stage 1 Objectives:
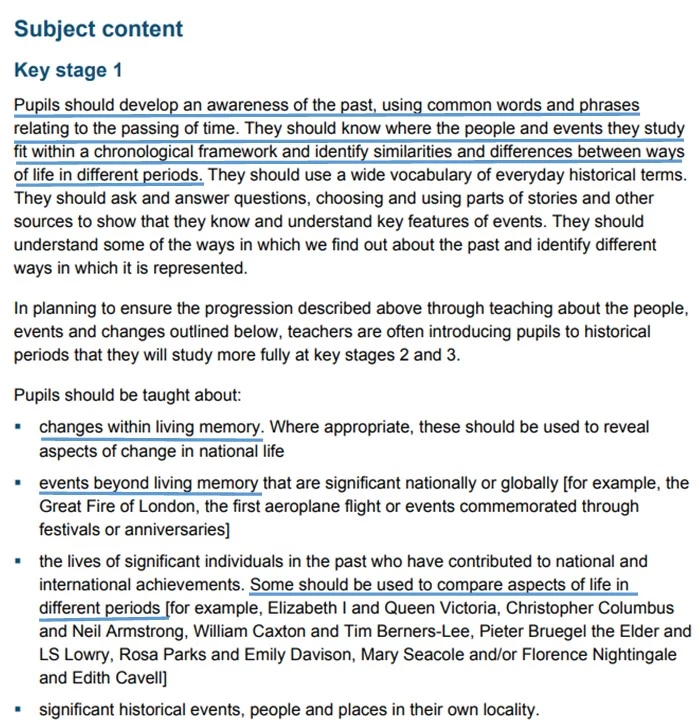
Here is an annotated screenshot of the subject content for KS1. All of the content which is explicit chronology or chronologically underpinned is underlined. What stands out?
Hopefully what’s clear is the way in which chronology underpins every aspect of the knowledge that we teach. In terms of using a central chronology display, there are a number of key ways this would support the development and then application of a greater chronological understanding.
What to Include:
Let’s begin with the obvious. Every suggestion is space dependent! With that in mind, there are two branches of chronology to consider:
1) the overall narrative (framework as the curriculum names it).
2) the internal narrative being studied in depth during a particular topic.
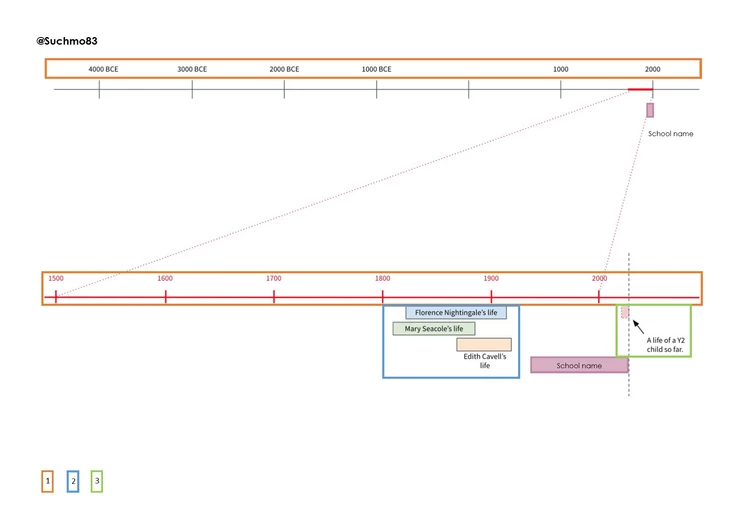
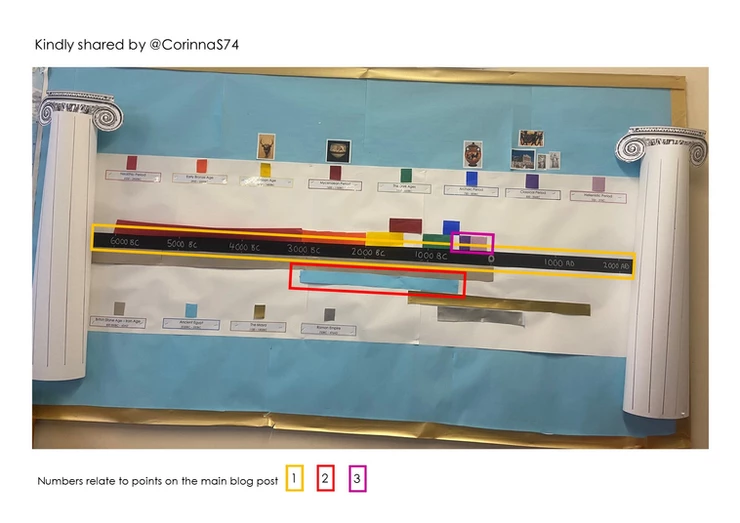
After positing on social media about this blog, I had a couple of people send through their examples. The first, from @Suchmo83 on twitter shows both examples using an expanded narrative below the overall picture.
As you can see, the link is established as to how the scale changes and there is a distinction between single events and duration. This is exactly the way in which I represent it – we both agree consistency of approach is key! He is writing a blog on this which I will link when it goes live. The coloured, numbered key relates to explanation below.
The question around using a numbered scale is an interesting one. If we use the curriculum specification, then ‘common words and phrases’ and ‘chronological framework’ are specified which would imply that no numbered scale is needed. In addition, children’s knowledge and understanding of place value in maths is 100 so are we going to add confusion by insisting on a numbered scale they won’t comprehend? Whilst talking to Chris, he said that no child is expected to use the numbers in Key Stage 1 but the consistent timeline across school means they are exposed to it in Y1 and 2 before making more deliberate and precise use in KS2. My own approach to this is below:
As a personal opinion, there are pros and cons to both but simple, effective and consistent are important which is why I use a colour-coded incremental scale for the overall narrative. I also have certain features which I use in all my timelines. First, scales are explicitly explained to ensure children understand what they are representing. Second, an arrow represents a single ‘point’ in time and a bar represents a longer duration. This helps highlight change over time and turning points more effectively. Chris’ scale would achieve a similar outcome because it’s consistent and developed throughout school in incremental steps. There is a fine balance between visual simplicity and accurately representing the complex narrative of history.
Interacting and Understanding
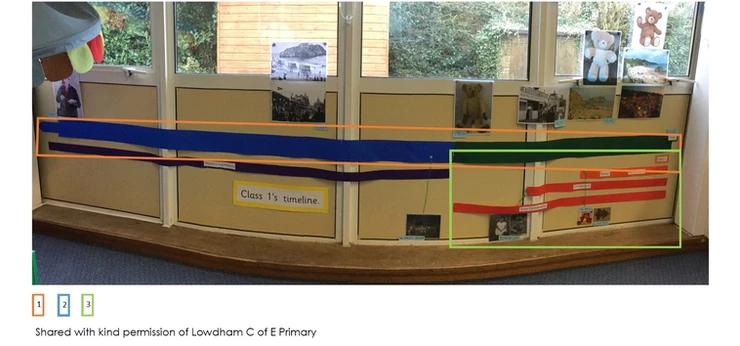
This second example uses a timeline to reinforce the key concept of duration. Within and beyond living memory are paramount to build on the EYFS’ ELG of now and past. It’s also really useful to have it at child height so that they can interact with it independently and under explicit instruction. The pictures directly relate to what has been studied/is currently being studied.
The colour-coded school to help reinforce the narrative of past starting at today, which is labelled as now, to anchor the understanding and then looking backwards to within living memory (what can be remembered by those alive today) and beyond it.
However your timeline looks, it’s crucial that understanding is built and children have the opportunity to engage with what it means and then what it represents:
1)The scale! This helps introduce children to key concepts such as interval and duration. In addition, it highlights the link between the timeline and mathematical understanding of graphs and bar modelling. Both examples have a clear scale which allows accurate placement of the lives of significant individual or to highlight where in history the changes within living memory ‘sit’.
2)The curriculum specifies ‘They should know where the people and events they study fit within a chronological framework and identify similarities and differences between ways of life in different periods’ and by having a clear timeline setting the overall narrative, this becomes an easier task. It supports children to use everyday vocabulary such as before, after, earliest etc. This isn’t depicted on the second image as the example comes from their first history topic of the year. It will, however, be built up and added to as their knowledge base increases.
3) In EYFS and KS1, using the child’s own lives so far is a good start point to support them understanding that the past is what has already happened and they can remember a small fraction of it. That’s where the original idea for depicting living memory in image two came from including the overlap of grandparents’ living memory including the parent’s and child’s. Image 1 does the same using the child and also the history of the school which ties into their taught curriculum.
Where and when to teach it?
Setting the context is really important. Chronological understanding is built up and reinforced as part of each topic and then a way to link between them. Always begin teaching with context to introduce where and when in the past this new topic sits (that’s the overall narrative). In addition, it’s also a good place to introduce the core vocabulary using a knowledge organiser as both help to master the minimum knowledge (phrase shamelessly stolen from @MrBartlettHist’s recent teachmeet session). In addition, keep reinforcing this understanding of the internal narrative throughout. It helps to highlight the significance of a point in someone’s live, a turning point for an event or the legacy of said point.
Where next?
By the end of KS1, what do we want the children to understand about chronology? This is an initial unedited list of initial thoughts as I intend to refine and revisit when I’ve considered it in more depth:
1) Chronology is a way to understand how history ‘fits together’. We can use timelines to understand where our learning sits in the past and begin to compare it.
2) We start reading timelines from now and always work backwards into the past. Time flows from left to right.
3) The scale of history. Within living memory is a much shorter duration than beyond.
4) There is so much more history to be studied than we have learned so far.
5) Use relevant vocabulary and begin to talk about the narrative they have learned. The earliest event was the GFoL, after that was Florence Nightingale and Edith Cavell etc.
What next?
In Key Stage 2, periodisation of the past to show the greater breadth of study we teach and the more precise way our scales and timelines are depicted. These are good next steps for year 3 to begin with.
Chronology is a dominant feature of the primary National Curriculum for history (NC2014). There is a clear link from Ofsted’s report ‘History for All’ in 2011 to the NC2014 (let’s ignore the monstrosity that was draft 1 shall we!). A couple of key phrases stand out: “Although pupils in primary schools generally had good knowledge of particular topics and episodes in history, their chronological understanding and their ability to make links across the knowledge they had gained were weaker.” (p5) This, anecdotally, is something many schools that I work with say is a difficulty for their children. A recommendation from History for All was that: “…pupils in primary schools experience history as a coherent subject which develops their knowledge, thinking and understanding, especially their chronological understanding,” (p7). The influence of this is evident across the curriculum’s purpose of study, aims and subject content. If you haven’t already read them, make sure you do because they explain so much more about how we teach history and the breadth beyond toys, Romans or the Great Fire of London.
How it impacted my teaching of chronology:
Teaching it in two clear ways: the overall narrative or wider history to reinforce how the timelines fit together to form the ‘complete’ narrative. This and the internal narrative of each period of history which is more detailed and sets out the narrative to be taught across that half-term. This was influenced by the glorious work of Ian Dawson who said at the first Northern History Forum (now called the Yorkshire History Forum) to use the language of story when teaching chronology. He used the words to the effect of, “We are learning the story of the Romans. We don’t have time to learn the full story and will only get chance to look at a couple of phrases.” As I now know, this uses the same principles as Willingham showing that the human brain privileges story. The implication for my teaching is that I use narrative extensively as an idea within history… I mean, the word is right there!
Ensuring chronology is just not just a quick tick box activity completed once at the start of the topic to tick that objective off the progression of skills spreadsheet (DON’T get me started on assessment spreadsheets for primary foundation subjects). But rather a fundamental part of the teaching sequence for adding new, linking to existing and reinforcing the core knowledge associated with the enquiry question. “Chronology is a key organising tool for developing pupils’ understanding of history and as a ‘concept’ within the history curriculum.” (Phillips, 2008 cited here) From this, we can conclude that ‘chronology’ is an ongoing process in students learning of history and plays an important role in the both the teaching and learning of history. This is not something I was aware of when I started teaching.
Finally, teaching children how to interpret the timelines had to be a fundamental building block during lessons alongside the substantive knowledge which they presented. There is such a direct link to maths and therefore it was helpful to consider the presentation and complexity of the data. I’ve annotated two of the display pictures I was tagged in (with kind permission from the teachers) to explain this below.
Materials to use:
If you ever have to endure CPD from me around chronology, you’ll come to know my love of using border paper for timeline construction – it’s the perfect material and schools have it in abundance! All of the following points can be done with border paper and either on the floor for more active engagement and exploration or as a display on the wall to refer to and build on. I am absolutely aware that schools use toilet paper for the same purpose, using each sheet as an increment on the scale but, personal preference sends me to border paper.
Building the timeline:
I will always advocate for building BIIIIIIG timelines and ensuring children have chance to interact with them to fully engage with the information it presents. This blog by my great mentor in all things history (@historyprimary) sums it up. The approach mirrors the annotations of the timeline display so should hopefully help:
1) Numbered scale – by adding a numbered scale, we can make our timelines more precise, easier to construct and interpret. A common pitfall is the labelling of year 0. Because of the way we count centuries, there is no year 0 and we move from 1 BC/BCE to AD/CE 1. The clear and precise scale is a requirement for the subsequent points to work. For the majority of primary classes, I construct and label the scale so the focus is on the timeline bars and making the links between them. The exception was a Year 6 class who I had built timelines with before. They were really familiar with the process so it was a step for them to take control over. We built the timeline across the hall and used post-its labelled with centuries as markers. I always put an arrow on my scale to indicate time expands far further into the past than we could every show on a display/in a lesson. It also forms a key teaching point to ensure the enormous duration of the Palaeolithic isn’t misunderstood.
2) Periodisation, intervals and duration – We teach periods of history across Key Stage 2. This is a core concept to cover when we introduce history to Year 3. The fact that we are studying history across hundreds or potentially even millions of years makes and including the lives of a range of people, a multitude of events etc makes it a more challenging concept than in Key Stage 1. To that end, the overall narrative timeline shows simple bars to ensure the focus is on the narrative. The differing duration is simpler to identify because of the accurate scale and bar sizes (similar to a bar model/graph in maths). For British history, where the periods that we teach flow naturally, children can identify that there may be intervals between periods (end of Roman Britain in 410 AD to the alleged arrival of Hengist and Horsa in AD 450).
3) Relative position on the overall narrative – When teaching the achievements of Ancient Greece, we mainly focus on the classical period. This is a smaller part of the narrative of the history of Greece so appears with a small duration on the timeline. We can then have a second timeline with a much smaller scale to interpret that period of time with more precision and depth. The principle is that we can highlight the overall narrative before ‘zooming in’ on one smaller part. I use the phrase zooming in as the children are familiar with the action on iPads etc. If you really must, you can even have a gimmicked sound or action… not for me mind you!
4) Bars for periods or a duration of time and arrows for single events or ‘points’ – this was something that took me a couple of attempts to get right when teaching the internal narrative. I was used to building the timelines, talking about periodisation, duration and intervals but the display didn’t really represent them effectively enough. I tried arrows for start and end points but didn’t feel the connection was strong enough. As such, the arrow for points and bars for duration become my choice. It allows me to distinguish between a singular event and a change over time. This links to the accompanying disciplinary understanding of continuity and change.
For example:
– I’d mark Boudicca’s revolt in AD60 – 61 as a point (marked with an arrow) because it’s a short duration of time and, in effect, one point on the overall timeline even though it covers more than one year.
– the construction of around 8,000 miles of road would be a bar because it was a change that took place across the first 60 years or so of the period. It’s also an effective way of summarising a group of linked events. On the second example shown, it’s harder to see the duration of the First World war with two strings when it’s so close to the Treaty of Versailles being signed.
5) Link between British and world history using the scale to support – one of the most important NC2014 aims is number 6 which is located on a different page to the other 5 so could easily be missed. It states: “gain historical perspective by placing their growing knowledge into different contexts, understanding the connections between local, regional, national and international history; between cultural, economic, military, political, religious and social history; and between short- and long-term timescales.” Because of this, I always depict British and world history separately to ensure the concurrence is clear and make the connections can be established clearly. A natural boundary would be the scale and having British history above and world history below. Then, as the overall narrative is constructed, the concurrent periods can be established, discussed and any interactions considered. Although not literally related to the timeline display, having a world map established to make those links is an absolute must. The two disciplines are absolutely linked when establishing the links between British and world history.
What to include on the overall narrative?
What should I put on my overall narrative is an important question to consider? It depends on a number of variables so the decision is more nuanced than choice a or b (that’s surely the narrative of teaching history…) so this hopefully covers a range of options. For any approach, it’s important to consider how to reinforce which periods of history interacted. The way in which I show this is with an overlap. In Key Stage 2, these would be:
– The British iron age and Roman Britain period
– The Anglo-Saxon and Viking conflict
– The expansion of the Roman empire, Ancient Egypt and Ancient Greece
– The Viking trade contact with the Abbasid Caliphate (Early Islamic history)
A whole school chronology display – in this case, it needs to represent everything that’s taught across Key Stage 2 history. The teaching would focus on which periods of history the children are already aware of and linking them to the knew knowledge taught.
A timeline in each class (my preferred option) – here, we can limit the amount of information based on what is taught. I would suggest having the LKS2 curriculum in both Year 3 and 4 to begin to build the narrative. The complete curriculum would be displayed in UKS2. The teaching in Year 3 would focus on establishing what a period of history is and how they form a narrative. Making links between what was taught in Year 3 and the continued narrative in 4. My logic here is based upon the fact that only having two history periods taught would result in a largely empty timeline and therefore harder to introduce the concept of periodisation and how the periods form the narrative. Year 4 could then add further depth and ensure links are established and reinforced. I would also consider what information must be presented on the overall narrative so as to reduce the unnecessary cognitive load on children. On the overall narrative, my preference is just the periods of history.
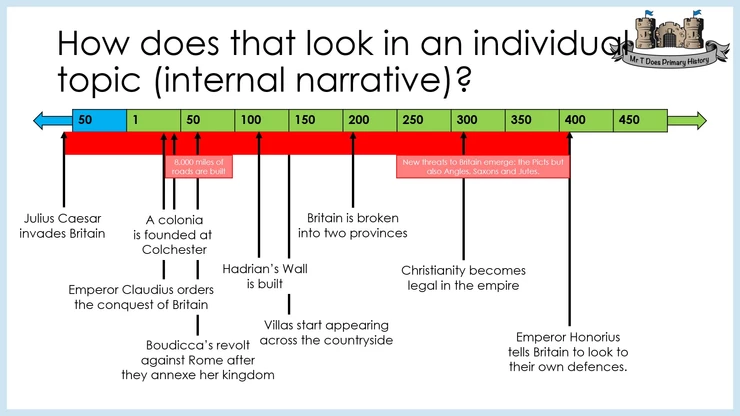
What to include on the internal narrative?
The purpose of my timelines of the internal narrative is to set out the context of what is to be taught during the subsequent enquiry/enquiries. It is representing a much smaller duration of time than the overall narrative and can be more detailed to show specific events, people etc. Using the timeline as an organisational tool helps to make those important links because the information is presented in context.
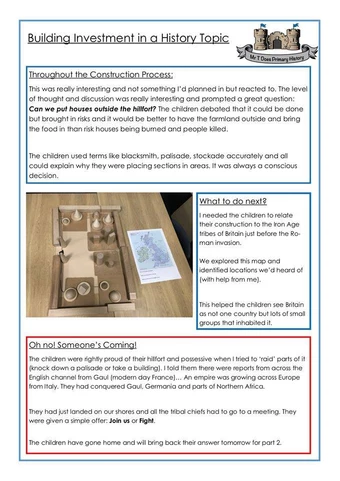
Once again, the key people, events and changes to be taught are what I would place on the timeline. If you aren’t teaching about something, why is it on your timeline? I’ve included a screenshot of a PPT example where all of the content ties directly to the taught lessons in history or the wider curriculum. The visual depiction allows me to break the Roman Britain period into three phases. First, the actual invasions, conquest and gaining control (although there were rebellions and raids throughout the period). Then, during the consolidation of control with Hadrian’s Wall being built alongside villas etc being built. Finally, post 250AD, the raids from the Picts et al was a feature of the weakening grip Rome had on its empire at large.
The chronology display as part of the teaching sequence
Every time a lesson is taught, the position on the internal narrative is reinforced and linked to what the children already know. If there’s a substantive link between this and a previous period studied, this can explored using the overall narrative timeline. If your school uses a working wall approach to displays, greater depth of information can be added with annotated pieces of work, collaborative tasks etc.
Hopefully what came from this blog is an urge to teach more chronology! – Teach it explicitly at the start of topics, reinforce the overall narrative and where the new period sits.
– Add introductory context by constructing the internal narrative. Be mindful to put key facts on and not overdo it!
– Reinforce the internal narrative throughout each topic and make links where appropriate.
– The importance with teaching history with a sense of narrative. The overall narrative to show how the periods of history we teach fit together, flow concurrently and how civilisations interacted with each other.
– Understanding the composite parts of a timeline so it’s more than just a random sequence with no context.
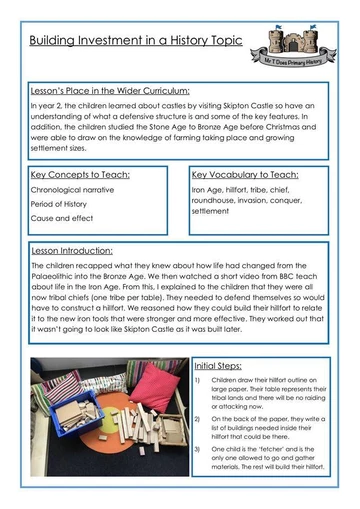
This topic is taught to my Year 3 class and is the second history topic of the year, which follows on from the Stone Age to Iron Age topic that I wrote a blog about before Christmas. In English, we used the Leopard in the Golden Cage by Julia Edwards as it is set in Roman Britain around Fishbourne Palace and is a great narrative with some wonderfully accurate details.
Connecting the Historical Narrative:
I deliberately stressed the concept of narrative in British history to help children understand the fact that the British history we teach is a narrative using the ideas of Ian Dawson. This is a summary of the lesson below:
I’ve begun to term this kind of lesson a bridging lesson where the principle is to ensure children understand how history crosses from the Iron Age into the Roman period.
Sequence of Lessons:
1) Bridging the chronology of British history and reinforce periodisation and duration that was taught in the previous unit of work.
2) Celtic reaction to the invasion and the consequences of those choices using Boudicca and Cartimandua as key individuals.
3) Roman achievements (roads, towns and sanitation in particular) using the same criteria for significance each time and evidence gathering systems to allow comparisons to be made between them.
4) A depth study on York as a significant settlement in Roman Britain.
5) The wider Roman Empire including how it spread, contracted etc and a way for children to understand the local, national and world picture of history at this time. Timemaps and this video really helped children understand the scale of change over time – I narrated key changes and reinforced the use of the colours as to the changing face of the Empire.
Key Knowledge and Concepts:
The best place to look for the key knowledge is the overall curriculum statement from the NC 2014. The statutory statement must be the driving force behind the curriculum and the statements in the box below are for guidance only.
Over this topic, the key knowledge children will be coming away with is:
1) The narrative of British history and how this topic builds on what they know already.
2) The concept of migration of people as an invasion compared with the nomadic lifestyle in prehistory.
3) How the Romans changed and ‘improved’ Britain including the legacy that we can still see today.
4) The expansion of the Roman Empire and that it included multiple modern countries then the contraction.
Concepts being covered have been broken into two separate groups: Disciplinary Concepts and Themes which are used to link topics together.
Disciplinary Concepts:
Enquiry Approach – the learning focuses on how the Romans changed Britain and the legacy that we can see today.
Cause and Consequence – how the different Celtic tribes reacted to Roman invasion and the consequences of those choices.
Significance – which of the Roman achievements in Britain had the most significant impact on people at the time.
Evidence – throughout the topic, the children use a range of sources to learn from and combine the findings including archaeology, primary source material from Tacitus, and a range of secondary sources.
Themes:
Migration and Movement of People – this is a comparison between the nomadic life of people in the Palaeolithic and Mesolithic and what an invasion is. The children also began to consider aspects of life such as trade.
Culture – as part of the depth study into Roman York, children learned about the alleged gladiator graveyard and bathhouse mentioned in the class text.
These are my ideas for the teaching of the Romans and is by no means the only option! Remember, there is no right and wrong answer to this topic – it’s important to deliberately stress concepts and vocabulary so ensure that what is taught is thought through as to how it meets with the aim of the overall enquiry.
I’d love to know your thoughts!
This is an update on the previous blog on this subject, which can be seen at this link, and aims to work alongside it. Someone said to me a few years ago my child doesn’t like writing but loves history – making them write will turn them away from history as well. My approach is still the same: keep history at the absolute forefront and use it as a vehicle to include appropriate pieces of writing with a clear purpose and aim.
The New Inspection Framework
The new framework’s clear intention is to put curriculum at the forefront of our minds. What we choose to teach is now crucial and what we record is also really significant as a record of what we have done. In a recent conference session led by OFSTED that I attended, they were critical of cross-curricular activities that don’t show subject progress. Does this mean we cant do them? Not at all! Cross-curricular links are really valuable but it is worth considering what they achieve. It’s also useful to remind ourselves that the books children write in will be one of the main evidence sources viewed so some great quality written work would really demonstrate what our curriculum is offering.
Writing in history needn’t be an onerous task not should it take up the vast majority of every lesson. By carefully selecting those opportunities, we can ensure they add value, meaning and fun to our curriculum.
How can we achieve this?
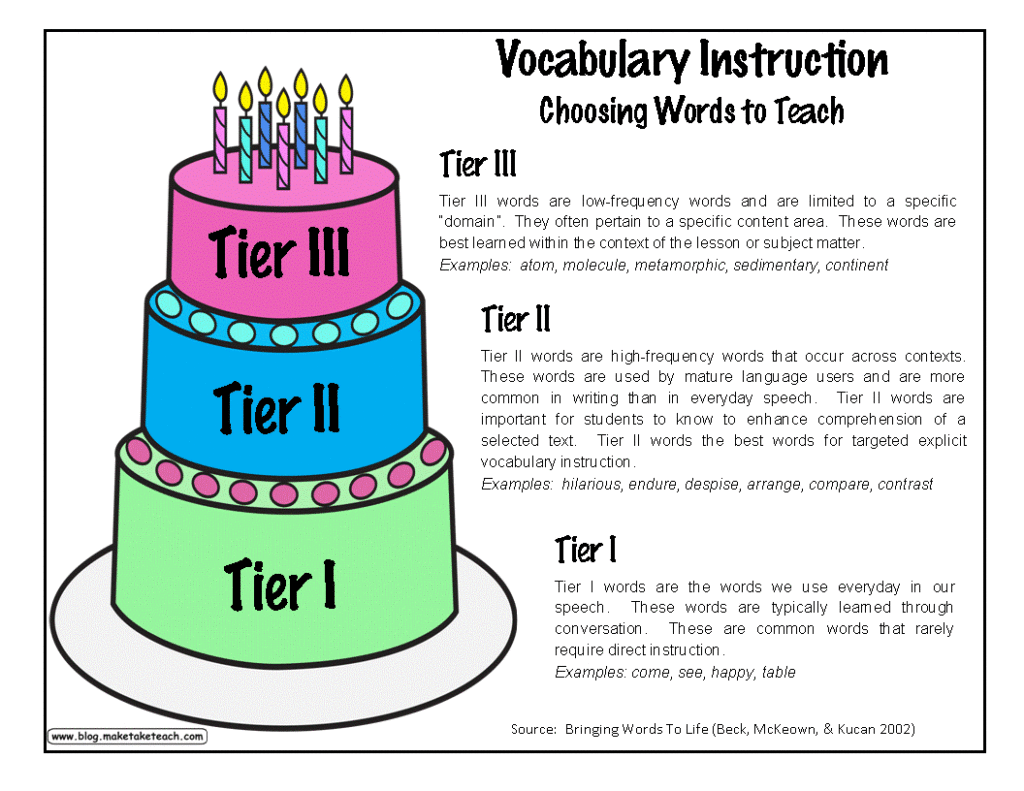
The Tiers of Language explained in the cake image have really clear applications to history and allowing the children to understand how to write in a number of different styles appropriately. Tier II is the academic style of writing that becomes increasingly more important as we move up through school and Tier III is their use of historical terminology and evidence. These does not in any way, shape or form have to be an extended piece of writing but it does give children a freedom to express their thinking clearly and really ‘show off’ what they’ve learned and understood.
Bringing Words to Life – Beck, Mckeown and Kucan (2002)
In writing, the children learn to use and apply what they have learned throughout the lesson and explain in the same way they’d be expected to in a reasoning lesson or as part of a comprehension.
It’s also really crucial to have a range of ways that children can write about their learning in lessons (as I’m sure we all know). These can take the form of short summaries of lessons through to more in depth explanations, arguments and debates. I always focus on putting more emphasis on how the children use their historical knowledge than their correct use of subordinating conjunctions, passive voice … I could go on. The aim is very definitely to keep history in the forefront of their minds and the attempt to include more complex writing skills is celebrated (accurate or not!).
Incorporating Skills
Any number of English skills can be applied into historical writing with some thought and consideration. Always begin by teaching these skills independently of history lessons to ensure experience and the beginnings of fluent application. Once they have this foundation, we can extend this by linking the writing tasks to the academic style mentioned in the tiers of language. By making clear reference to the formal and academic style, we can tie in a range of SPaG skills. I tend to make use of the following very consciously:
Reasoning, justification and explanation linked in to use of conjunctions This works at various parts of the lesson and focuses the children’s mind as to which part of a source or which piece of evidence will best help them answer the question. Reminding how each conjunction is used and then checking accuracy makes it clear why SPaG is important and how it enhances their work. This really fits well with historical concepts such as significance, cause and effect, continuity and change … I could go on!
Summarising knowledge At the end of a lesson, a quick summary about what has been learned creates clear use for a range of sentence types whilst focusing in on the application of the most important knowledge gained in the lesson.
Those mentioned in the previous blog on this website (link at the top of this page).
Scaffolding and Stretching
The classroom environment is important as it will be full of the scaffolds that children need: word mats, working walls… etc but it’s far more important for them to focus on the history knowledge. Cloze procedures, sentence starters modelling the required English skills and notes from the lesson recorded centrally on the board or sugar paper.
Stretching the more able historians is an interesting and challenging task especially when, in the vast majority of cases, the lesson has been the same for all. It’s really important for the more able to have the chance to study an additional source of a different kind (image, archaeology, primary written source); a source that offers a greater depth of knowledge or the chance to complete further research to answer their own questions. Once they have been exposed to a greater depth of knowledge, they have the knowledge base from which to combine source and produce more developed explanations and justifications.
English or History?
It’s important that we ensure that the focus of marking and any assessment is of the history element of any work completed. In their phase 3 research, OFSTED pointed out the worrying case that ‘There were also several instances when progression in foundation subjects was not secure because pupils’ outcomes were assessed against writing criteria. In other words, the subject-specific knowledge that was intended to be taught was lost among generic writing criteria. Some foundation leaders also reported that senior leaders promoted this and that written outcomes in history and geography were vehicles to successful writing assessments.’ Although this blog focuses on integrating writing, it’s vital that history and its subject discipline skills are the clear focus.
This is by no means an exhaustive list or the finished product! I’ve just started adding in motivational elements such as bingo cards to include certain writing skills and use of historical concepts and knowledge.
I’m also looking to actively explore how I can broaden the use in enquiry lessons using scaffolding for knowledge and skills.
Multiple sources of evidence and how to report common evidence, contrasting evidence etc.
Lots of ideas and very interested to hear your thoughts!
Where did this start?
The original idea for this came when I was teaching in Year 6 in 2016-17. We were reviewing the KS2 TAF for writing and really wanted to push writing across the curriculum and I focused on how this could be applied into history effectively, independently and (more importantly) not sucking the fun out of the topics.
To this end, we came up with the guiding principle of ‘logical links’ to ensure that children saw history/historical knowledge/second order concepts etc was the priority and embedding the children’s writing was a secondary consideration. This ran across the whole curriculum.
In May of that year, I presented the findings to a select (small) group of delegates at the Historical Association Conference in Manchester and then, later, at the Yorkshire History Forum. The ideas make use of what’s in the classroom already and get the children into good habits (most of which I’d like to think are common sense).
What are some of the logical links?
Chronological adverbials
If you’ve ever attended one of my sessions, or messaged, you’ll know how much I push forward chronology teaching at the heart of every topic! Without that, it’s just isolated facts.
Once the initial chronology has been taught, we can embed some writing into the lesson as a way of recording into books or, alternatively, as a way of helping children understand why SPaG is important to help us express our thinking.
Steps to follow:
1) Teach the timeline lesson exactly as you normally would!
2) Remind children of the meaning of chronology.
3) Depending on the year group, add in time adverbials such as then, next, after … years, to help them understand a) the linear nature of time and b) the intervals between events being sequenced.
4) To really extend this, we can think about adding in a relative clause to give additional context.
What does this produce?
There are loads of choices you can make: a practical border paper timeline with lots of notes and post-its over it to act as an example of what can be done, a written piece explaining event, dates and using adverbials to link them together.
Crossover between source work and reading content domains
This is definitely one that I’m sure teachers already do, but, may offer some new approaches on how to keep the historical element at the fore of the lesson. There any number of ways in which the two subjects can be tied together and here are a couple of approaches I tend to incorporate:
– Primary sources
What can we learn from this source?
What can we infer about the author’s feeling towards the Vikings?
What does this phrase mean?
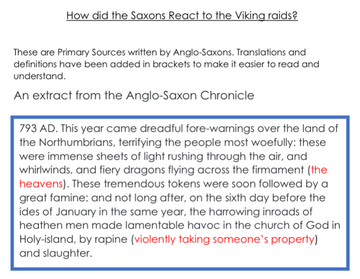
The text in red and inside brackets is there to help children understand certain aspects without braking up the flow of the text too much.
An extract from the Anglo-Saxon Chronicle
Modal enquiries
Enquiries are superb vehicles to apply in any number of historical and english skills. From knowledge selection to generating questions and further research. When drip feeding information, like the example below, children naturally use modal verbs to explain the degree of certainty as to if their theory is correct or not.
A source of evidence that opens up many lines of possible enquiry.
Begin with a seemingly simple question: What is it?
Why do you think this?
Use a scale of certainty to explore how certain they are focusing on use of evidence, modal verbs and
Then, allow them to ask questions to test out their thinking. I answer in one of three ways – tell them, say I don’t know if I don’t or I’m choosing not to tell you the answer because it gives too much away (it is actually a really good answer to show they’re on the right lines).
Add more context by showing different views or adding snippets of related information.
The aim is to learn about how we build up our understanding of the past using a range of sources and techniques. This works well with photos, paintings, artefacts etc and is a great way of hooking children in with a pertinent and engaging starter. Take a look at my historic photos album for more images to use in this way.
Impact of these steps?
There was a clear expectation of quality writing in every subject and the children rose the the challenge and, after a term of implementation, very few needed reminders to incorporate a range of skills, techniques and approaches into their work.
It was a natural step to make use of the classroom displays to help make use of the English skills and concepts and the children became far more fluent at incorporating them into various pieces of work.
We all know that making links between subjects and topics is really valuable and these are several ways in which SPaG skills can be used naturally in history. It also works effectively alongside the principles of the different tiers of language (see: Beck, Isabel L., McKeown, Margaret G., and Kucan, Linda, Bringing words to life, 2002)
What next?
The new focus onto curriculum, knowledge, and the broad and balanced curriculum opens up new challenges for us to work towards! How can we we keep progressing?
I’m really interested as to how you embed writing skills into history lessons and topics.
On July 24th, 1969, Apollo 11 landed on the surface of the Moon. Neil Armstrong uttered those immortal words and the world was changed forever! 50 years later, it’s important to commemorate this achievement in school and look at how far our understanding of space has developed and what science, maths and engineering has helped us achieve.
Neil Armstrong being rescued after landing back on Earth
What Could we do to Mark the Anniversary?
An anniversary assembly looking at the space race between the USA and USSR (Soviet Russia) would be an easy to manage way of teaching children about it.
A day focused on it would cover many aspect of the curriculum with a real and effective context.
Involving the Whole School:
Each year group can easily take on an aspect of the event and share them at the end of the day or, alternatively, teach about the story in an age appropriate way.
It fits into both the Key Stage 1 and 2 curriculum in various subjects and, with a bit of creativity, could easily produce some really excellent pieces of work. My initial thoughts include: a collaborative collage of the moon’s surface with the Apollo 11 Eagle stood on the surface, a dramatic exploration of how the people of mission control would feel when all they received from Apollo was radio transmissions using computer equipment less sophisticated than is found in a mobile phone, and analysing the roles that contributed to the mission’s success or listening to the incredible video, photographic and audio sources we have available to use… I could easily go on!
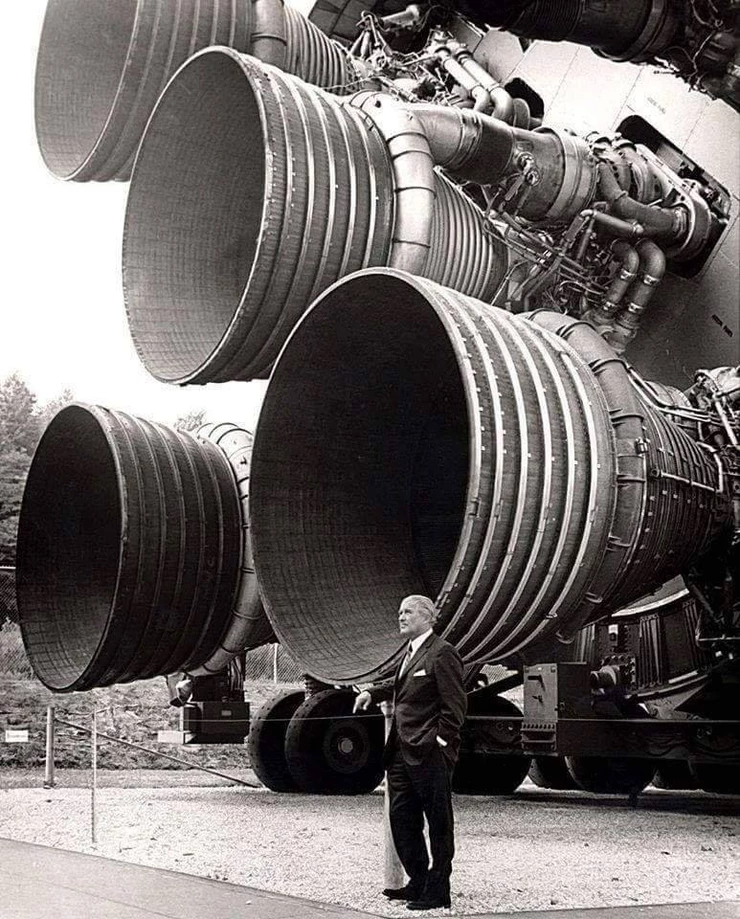
OK… one more, Saturn V is the most complex machine ever built – 3,000,000 plus pieces – definitely worthy of study! Think of the engineering and maths involved in its creation. Where could STEM take us? In this case, to the moon and back!
I just wanted to send a quick email to say how fantastic the resources and planning are for your recent unit on Ancient Greece. So far, I have only done the first session, but have prepared/read through the second session and it is so pleasing that I have very little to do for it!!
The kids loved the lesson style - so much time to chat and dig deep into proper history talk and I feel their learning will progress so much more satisfactorily because of all this.
A. Amos – Teacher, Leeds
Your visit was really inspiring, and having a pair of impartial eyes to look over our curriculum and books is just what we needed. We have really clear points going forward on how we can improve. Staff were so positive about the training too, something for everyone to take away. I'll be doing a follow up staff meeting in a few weeks.
You are genuinely brilliant at what you do and it was great to chat with a fellow history nerd! Really appreciate the documents you have sent over too, very generous.
N. Evans – History Lead
Really informative, great ideas, helpful advise and some fab resources. Thank you so much
C. Fielder, Curriculum Lead, Milton Keynes
We had a training day today; it was both fun and very inspirational. Lots of sensible and clear ideas to make History more engaging and purposeful for pupils.
A. Wells, Deputy Headteacher, Lincolnshire
I can’t recommend Mr T does Primary History enough. I am new to leading this particular subject and I left his training today feeling completely inspired. Thanks again Mr T
Louise Hill, History Subject Lead
Just purchased the Ancient Greek unit plan for 3/4 and its excellent! Certainly made my planning a lot easier! Many thanks, look forward to buying other units throughout the year!
I. Fern, Teacher
Awesome day spent with Mr T today going through our books and curriculum with a fine tooth comb. Great to know we were on the right track and to get clarity and direction on what we weren't sure about. Great staff meeting about how to use historical sources in a range of ways across the year groups.
H. Doust, History Subject Lead, Kirton Lindsey School